

Assembling the Temperature Thing.
How to build a thermometer that can be read remotely on your phone for cheap. No programming and no soldering. Very secure and no information gathering. No email signup. Anyone could do it.

#arduino #iot #esp8266 #dht11 #knotfree #mqtt5nano #thermometer
Below are the assembly instructions. The theory and programming documentation is elsewhere. It’s a fun little project.
Parts:
ESP8266 with headers $3.17 to $7.99 These are available many places.
DHT11 Temperature Sensor. About $2.30
Base price about $5.00
These things are so cheap that it’s hard to buy just one without paying way too much. If you are interested in a kit with all the parts leave a comment below. Maybe we can get someone to do that.
Other things needed:
A laptop or computer with a usb port. WiFi. If you want to use it from your phone you need a phone 😀. You will also need a usb-micro charging cable (aka Android charger), (from $1.78) and a charger block (from $2.11 ).
Some kind of a small box might be nice and some double sided tape. I like sticky ‘velcro’ for the times when I want to mount things (about $0.25 for 6”).
Overview
We will need to plug in 3 wires. Then, make up two names and two passwords and you will need your wifi name and password.
Then we will download a popular app to your computer (Arduino 2.0). Connect the USB to the computer and press some buttons.
Then in the same app you will enter the names, passwords, wifi and a ‘token’ that you can get from knotfree.net
Lastly we setup knotfree.net to send commands to your new thermometer.
Wire it up.
It’s just 3 wires so it’s really easy. The wires come with the DHT11 sensor. The colors vary. You just plug them on to the pins.
They go like this.
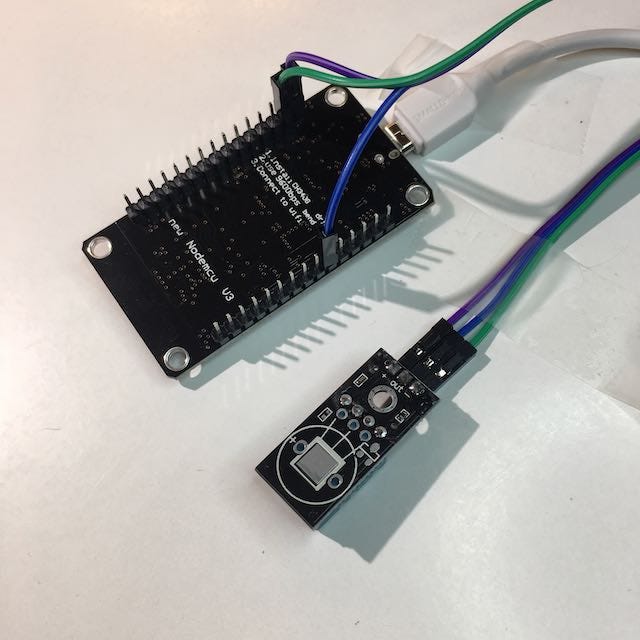
This is the front side:

The + on the sensor goes to the VIN on the board.
The - on the sensor goes to the G on the board.
The ‘out’ in the sensor goes to the D7 on the board.
Write down the passwords.
I highly recommend that you write down the passwords. I do it in the format below and I recommend that. I type them into a text file but there are many possibilities (‘notepad’, ‘Notes’ on a mac is good, Lastpass would be the most secure, etc.)
Copy this and change the values:
set admin password demoadminpass
set device password demo-Device
set long name demo-small-window-allow-should-engine
set short name demotemp
set token eyJhbGciOiJFZERTQSIsInR5cCI6IkpXVCJ9.eyJleHAiOjE2ODI3MzExMDMsImlzcyI6Il85c2giLCJqdGkiOiJyN3ZwaTE1bHoybDJvYTZqamFmajlhc2QiLCJpbiI6MTUyLCJvdXQiOjE1Miwic3UiOjEwMCwiY28iOjQsInVybCI6Imtub3RmcmVlLm5ldCJ9.E3fQwQ4pIGvwNnZ8UDiSthBH1aKkg28qAc6BTqmG6K-rxKt-VtPhZzHFFDBhTU65RbFr6BWvbmBQ17QGEqgNCg
set wifi yourwifi
set pass secretwifipass
The two passwords are only as good as you make them. Longer and more random is better.
The reason we have passwords like this is because all the commands you send to your device are encrypted end-to-end. Nobody can read them or make them but you. Knotfree never knows what your passwords are and cannot recover them. Knotfree doesn’t know any personal info about you. Knotfree doesn’t have a cookie policy because it never uses cookies!
The two names must be lowercase or numbers only. Later they will used on the web and those are website name rules. The long name must be unique in all the world which is not hard if it’s long and random. Note how I start with the name and then add random words. (you can get random words from the ‘misc’ tab at knotfree.net)
That long line of alphabet soup is the access ‘token’ that your thing uses to get online. That one is likely expired so you should easily get another from knotfree.net.
The last two are the name and password to your wifi.
Download the Arduino App to your computer.
Just follow these directions: https://docs.arduino.cc/software/ide-v2/tutorials/getting-started/ide-v2-downloading-and-installing This is a popular app so there are many articles to help you if needed.
Upload the program to the board.
Follow these instructions one time to set up Arduino for the ESP8266 that we are using: https://randomnerdtutorials.com/installing-esp8266-nodemcu-arduino-ide-2-0/
Open the Arduino App. Click on the ‘Tools’ menu and then select ‘Board’ and then ‘Boards Manager...’

Type in ‘esp8266’ in the search bar. Like this: (it may look slightly different)
Scroll down and click the INSTALL button at the bottom.
Now, Click on the ‘Tools’ menu and select ‘Manage Libraries…’.
Type in ‘knotfree’. It should look like this except with a higher version number (like v0.4.0):
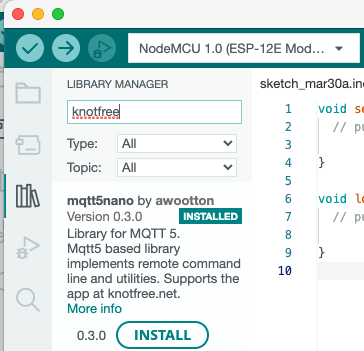
Install it.
Back to the ‘Tools’ menu and select ‘Manage Libraries…’. This time type in ‘DHT11 Adafruit’ and select like this:

Install it. If it says “install all” say yes.
And then finally, we can get the code.
Click the “File” menu then “examples” and then find “mqtt5nano” and then click on “DHT11_Thermometer”.

Then try clicking the ‘Sketch’ menu and select ‘Verify/Compile’. If after a minute there is no red text showing that says “error” when we’re good. If there’s a problem leave a comment below.
Finally, click on the “Select board” pulldown in the window (not the menus). It looks like this:

For the BOARDS search type in ‘nodemcu’ and pick ‘NodeMcu 1.0 (ESP-12E Module)’.
Plug the cable from the board that you just wired up into the USB port of your computer. A new item should show up in the PORTS list. On my Mac it’s “/dev/cu-usbserial-1420 Serial Port (USB)” like in the image above, in Windows it’s going to be something like “COM4”. It should look like this:

Click OK.
Select the ‘Sketch’ menu and then ‘Upload’. Wait for a minute. If there are no errors then congratulations. You have just programmed your first IOT device. Go immediately to the next step.
Send the passwords to the board.
Click on the ‘Tools’ menu and select ‘Serial Monitor’. You may have to do it twice. Select ‘115200 baud’ in the pull down. Type ‘help’ into the ‘Message’ bar and press the ‘return’ key. It should print out all the commands. Eg.
[favicon.ico] shortest png in the world🔓
[freemem] count of free memory
[get WiFi] WiFi name
[get admin hint] admin key start.🔓
[get c] temperature in °C 🔓
[get f] temperature in °F 🔓
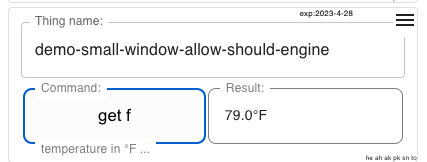
etc.Congratulations. You have just executed your first command. There are many commands but we don’t need to deal with them right now. You can try them out if you wish. Documentation here. Try typing ‘get f’ into the message bar. It should return the temperature! eg: 77.0°F
What we want to do is copy and paste the commands line by line from the list we made before. So, the first command would be set admin password demoadminpass (return key) and the next one set device password demo-Device etc until you have set the password to your wifi.
Type the command status and then look for wifi-connected:true in the result.
Set up the knotfree.net app.
Open the app at knotfree.net. It should look like this:

Click on ‘have a thing set up for you’. You will get this:

Pressing the ‘get random’ button will get you a random number. Clicking the ☰ (hamburger icon aka menu button) and selecting ‘Pick Command’ will allow you to try more commands than just ‘get random’.
Let’s set up our new thermometer. Click ☰ and then ‘New’. It will look like this:

Click on ‘Step 1: Enter long name’ and then paste in (or type) the long name you used before. And then ‘tab’ or click on ‘Step 2..’. The red ‘offline’ message should go away! If it doesn’t then there’s a problem.
Type your admin password from before in the ‘Admin password’ box. When you get it right the box will disappear and be replaced by a ‘Step 3: Pick a command’ button. Push it! Set the ‘get f’ command. Press the button! See:
Hint. Push the ☰ and select ‘Duplicate’ and then do ‘Pick Command’ on the new one and select the get humidity command because it’s more than just a thermometer.
Packaging?
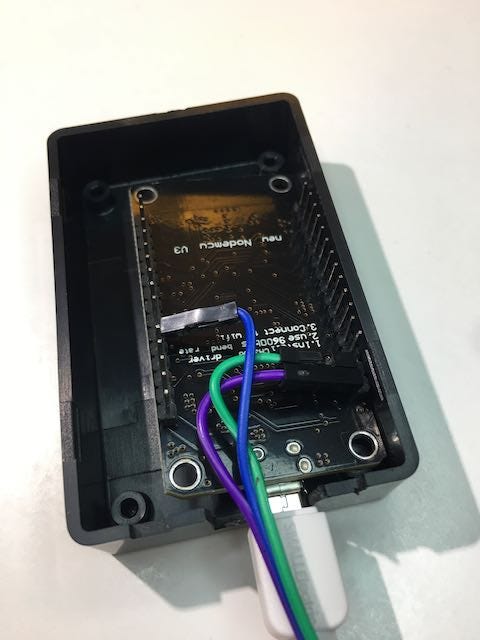
If you’re going to just stick it on a bookshelf behind some books then you may not need to do any packaging. I put one outside, so I felt like it needed to be in a box ($1.40 each for 5). The problem with the box technique is the box needs a hole for the wires to come out and unless you have a hacksaw, drill, side cutters, nibble tool or something for making the hole it’s non-trivial.
Bend the pins with the wires over and put it in the box:
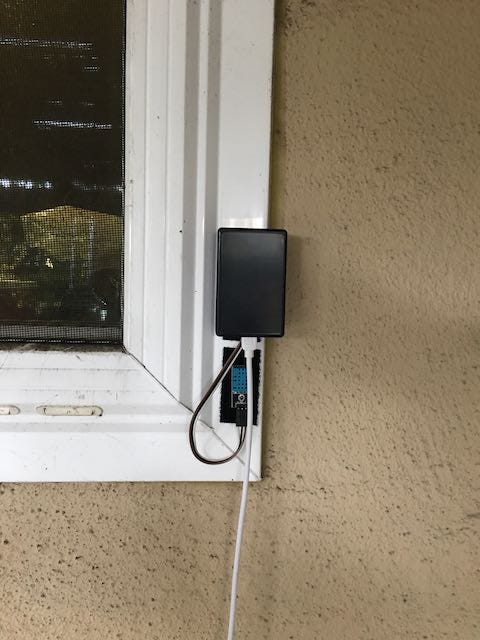
This is what it looks like in the cold outside the kitchen window attached with sticky ‘velcro’.
If you can think of a better way to package it, or find a better source for boxes please let me know!
Conclusion.
If you have any problems or questions please put them in the comments below. Eventually the process above will be streamlined but the method here will remain viable.
If you would like longer lasting access tokens follow me on Twitter and I’ll DM them to you. The default tokens expire every month.